If you want to improve your business and solicit feedback from your website visitors, surveys can help you gather the information you need to better understand and serve your customers. Online tools make creating surveys easier than ever, and recently Microsoft added a survey tool to its Excel Web App.
You can create surveys to share with customers and site visitors and, best of all, the survey automatically enters all of the responses into a worksheet for you to sort and analyze. Building a survey with the Excel Web app is a fairly straight-forward process, so let’s get started.
How to Create Surveys in the Excel Web App
Set Up the Survey
You access the free Microsoft Excel Web App from your SkyDrive account, so log in at SkyDrive.com. If you don’t have an account, you can sign up for a free account there. From the main documents area click Create > Excel Survey, and type a name for the workbook that will receive the survey results. Click Create.
A new Excel workbook will open with the Edit Survey dialog appearing over it. Start by typing a title for your survey—this is the title that the recipients will see. You can then type a survey description (recipients will also see this). Provide detail about the survey, for example why you’re sending it and what you plan to do with the data.
Add the Survey Questions
Click in the Enter your first question here box, and a dialog will open with details of the first survey question. Type the first question for the survey and add a subtitle for it, if desired. Now select the Response Type that describes the kind of response you want from the recipient. Your choices are text, paragraph text, number, date, time, yes/no and a list of predefined choices.

Figure 1: You can provide a question, a subtitle, a response type and a default answer for each question in the survey.
If you click the Required checkbox, the recipient must answer the question before they can submit the form—use this sparingly, or you may annoy your recipient. You can also, provide a default answer for any question by typing it into the Default Answer box. Once you complete the first question, you can continue and add the rest.
You can rearrange your questions simply by dragging and dropping them into the desired order. You can also edit a survey question: click on it, and then click the Gear icon to open the Edit Question dialog and make your changes.
The Yes/No and Choice response options provide a series of preset answers for your recipients. This saves your customers from having to type their answers, and limiting the range of possible answers makes it easier for you to analyze the results later on.
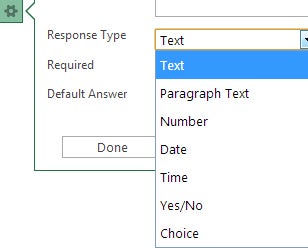
Figure 2: Choose the response type that best suits the answers you need from your customers.
When you’re satisfied with your survey, click the Save and View button to see the survey as it will look to your recipients. Click Edit Survey if you need to make changes to it, or click Share Survey > Create Link and you’ll receive a link that you can use to share the survey. You can click the Shorten Link button to receive a shortened URL for the survey. Copy the link to your clipboard, and then paste it into an email or share it with others via social media—or as a link on your website.
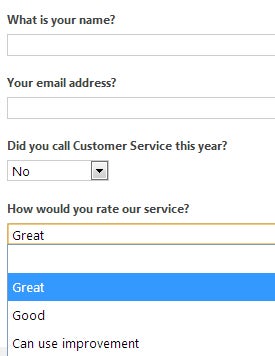
Figure 3: You can view and test the survey before getting a link to share it with others.
Collecting Survey Responses
Ideally, when recipients receive the survey link from you, they will click the link to view and complete the survey. They can complete the survey on almost any device that has a Web browser, such as a phone, tablet or computer. Recipients don’t need a SkyDrive account, and they don’t have to log in to any service to complete the survey.
As recipients complete your survey their answers are automatically added to the Excel worksheet—one row for each completed survey. At any time you can open the worksheet and view the responses and analyze the data by sorting and filtering it using the regular Excel tools.
And don’t worry—while survey participants can see and complete your survey, they will not have access to the survey results unless you specifically give them permission to access the workbook.

Figure 4: Responses to your Excel surveys will be assembled into the worksheet—one line per respondent.
5 Tips for Designing Surveys
Follow these tips when designing your survey:
1. Make your survey as easy to complete as possible.
2. Choose Yes/No and Choice response types, where appropriate, to avoid forcing recipients to type their answers.
3. Group related questions together so the survey flows logically. For example, ask for the recipient’s name and email address at the beginning or end of the form.
4. Ensure that all recipients can answer any “Required” responses.
5. Test your survey with friends, family or colleagues before launching it to make sure that the questions make sense and that the form is laid out in a logical way.
Helen Bradley is a respected international journalist writing regularly for small business and computer publications in the USA, Canada, South Africa, UK and Australia. You can learn more about her at her website, HelenBradley.com.
| Do you have a comment or question about this article or other small business topics in general? Speak out in the SmallBusinessComputing.com Forums. Join the discussion today! |